Smart Money Concepts: The Complete Guide
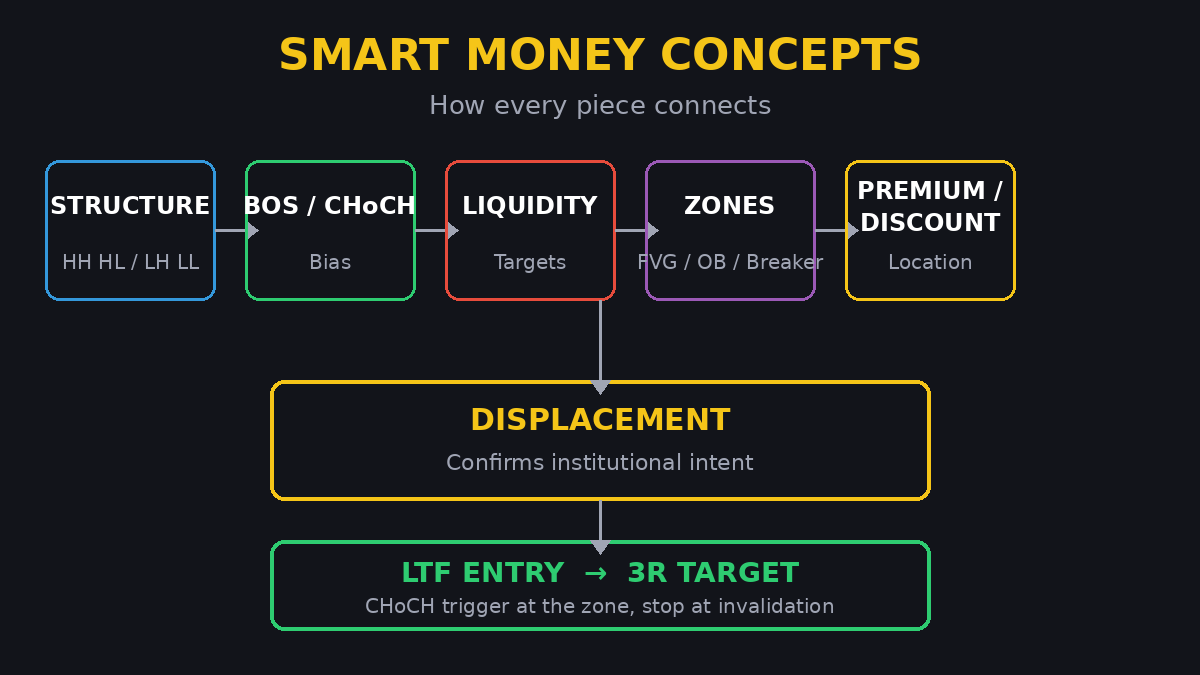
Smart Money Concepts (SMC) is a way of reading price based on one observation: large participants cannot hide their footprints. When institutions accumulate or distribute size, they leave traces — in the shape of structure, in swept liquidity, in the gaps price leaves behind. SMC is the vocabulary for reading those traces.
This guide puts every core concept in one place and — more importantly — shows how they connect. Each concept alone is just a definition. Together, they form a complete method for reading the market.
The core idea in one paragraph
Price does not move randomly. It moves from liquidity to liquidity: resting stops above old highs and below old lows are fuel for the next leg. Institutions need that fuel to fill large orders without moving price against themselves, so they engineer moves that trigger it — sweeps, false breaks, sharp displacements. If you learn to see where liquidity rests and how price behaves around it, you stop being the fuel and start trading alongside the engine. Everything in SMC is a variation of that sentence.
1. Market structure: the skeleton
Structure is the sequence of swings price prints: higher highs (HH) and higher lows (HL) in an uptrend, lower highs (LH) and lower lows (LL) in a downtrend. It is the skeleton everything else hangs on. Without a structure read, every other SMC concept floats in a vacuum — a "premium zone" means nothing if you don't know which trend it sits inside.
Two rules keep the read clean. First, one timeframe defines structure — pick it (the 1H works for most intraday traders) and don't let lower-timeframe noise redefine your trend. Second, structure is drawn from candle closes, not wick extremes; a spike through a level that closes back inside it changed nothing.
2. BOS: trend continuation
A Break of Structure (BOS) is price closing beyond the most recent external swing in the direction of the trend — a close above the last high in an uptrend, below the last low in a downtrend. It confirms the trend is still alive and the path of least resistance hasn't changed.
The practical use of BOS is restraint: after a BOS, you don't get creative. You trade with the trend, from discount in an uptrend and from premium in a downtrend. Full rules in our BOS vs CHoCH guide.
3. CHoCH: the first sign of a shift
A Change of Character (CHoCH) is a close beyond a swing against the current trend — the first crack in the structure. It doesn't guarantee a reversal; it announces that one is possible and flips your bias from "with the trend" to "watching for the flip."
The most reliable CHoCHs share two traits: they originate from the swing that printed the last BOS (not from random middle-of-nowhere swings), and they arrive with displacement — a sharp, committed move, not a slow drift. A lazy CHoCH after a liquidity sweep deserves more respect than an aggressive one in the middle of a range.
4. Internal vs external structure
Every timeframe contains two layers. External structure is the major swings that define the trend — the levels institutions actually defend. Internal structure is the smaller chop inside those swings — mostly retail noise.
This distinction prevents the most common SMC error: treating every little break as a trend change. A 15-minute BOS inside a Daily downtrend is internal noise, not a reversal. Mark external structure on your chosen timeframe; use internal structure only to time entries, never to set bias. Our top-down guide builds the full multi-timeframe method on this split.
5. Liquidity: where price is going
Liquidity is resting orders — buy stops above highs, sell stops below lows. Price is drawn to it because large players need counterparties to fill size. The cleanest liquidity sits at equal highs and equal lows: obvious levels where retail clusters stops, making them prime sweep targets.
A liquidity sweep is price spiking through a level to trigger those stops, then reversing. The sweep is not the trade — it's the tell. After a sweep, watch for displacement back in the intended direction; that's where the real move begins. Never short the low of a sweep or buy its high; you're standing where the stops just got eaten.
6. Fair value gaps: the footprints of urgency
When price moves so fast that it leaves a gap between one candle's wick and the next candle's wick — a three-candle imbalance — that's a fair value gap (FVG). It marks where aggressive buying or selling overwhelmed the other side so completely that price never got to trade fairly there.
FVGs matter for two reasons. First, price often returns to "rebalance" them, making them high-probability reaction zones. Second, an FVG inside your area of interest turns a vague zone into a precise one. But an FVG alone is not an entry — it needs trend alignment, premium/discount location, and ideally a lower-timeframe confirmation. Gaps in the middle of nowhere, against the trend, are just empty space.
7. Order blocks: where the money entered
An order block is the last opposing candle (or small consolidation) before a strong displacement move — the footprint of where large orders were placed before price expanded. When price returns to that zone, those same participants often defend it, making it a reaction area.
The valid order block is the one before the move that broke structure, not every random consolidation on the chart. Quality filter: the displacement out of the block should be sharp and should ideally take liquidity or break structure. A block that price drifts away from slowly is just a range, not an institution's footprint.
8. Breaker blocks: failed order blocks
When price sweeps through an order block instead of respecting it — taking the stops beneath it — and then displaces hard in the opposite direction, that broken block becomes a breaker block. The buyers who defended it got overwhelmed; their pain becomes fuel for the new direction.
Breakers are powerful because they combine two SMC forces: a liquidity sweep (the stops under the block) and a structure shift (the displacement). Expect strong reactions when price revisits a breaker — the market remembers where the trap was set.
9. Premium and discount: don't buy the top
Within any dealing range, the 50% equilibrium line splits premium (above) from discount (below). The rule is mechanical: in an uptrend you buy in discount, in a downtrend you sell in premium. Buying premium in an uptrend means paying the worst price in the range — exactly what institutions want you to do.
The OTE (Optimal Trade Entry) zone — the 62–79% retracement — refines this further: it's the deep pullback region where premium/discount, Fibonacci confluence, and often FVGs stack together. Most high-quality SMC entries happen here, not at the extremes. Full breakdown in our premium and discount guide.
10. Displacement: the signature of intent
Displacement is a sharp, committed move — several strong-bodied candles in one direction with minimal pullback. It's how you tell the difference between real institutional activity and retail chop. A BOS printed by displacement carries weight; a BOS printed by three doji candles drifting sideways does not.
Use displacement as your quality filter for everything: CHoCHs, BOSs, order blocks, breakers. If the move that created the signal was weak, the signal is weak. Strong hands move price with conviction — when you see that conviction, pay attention.
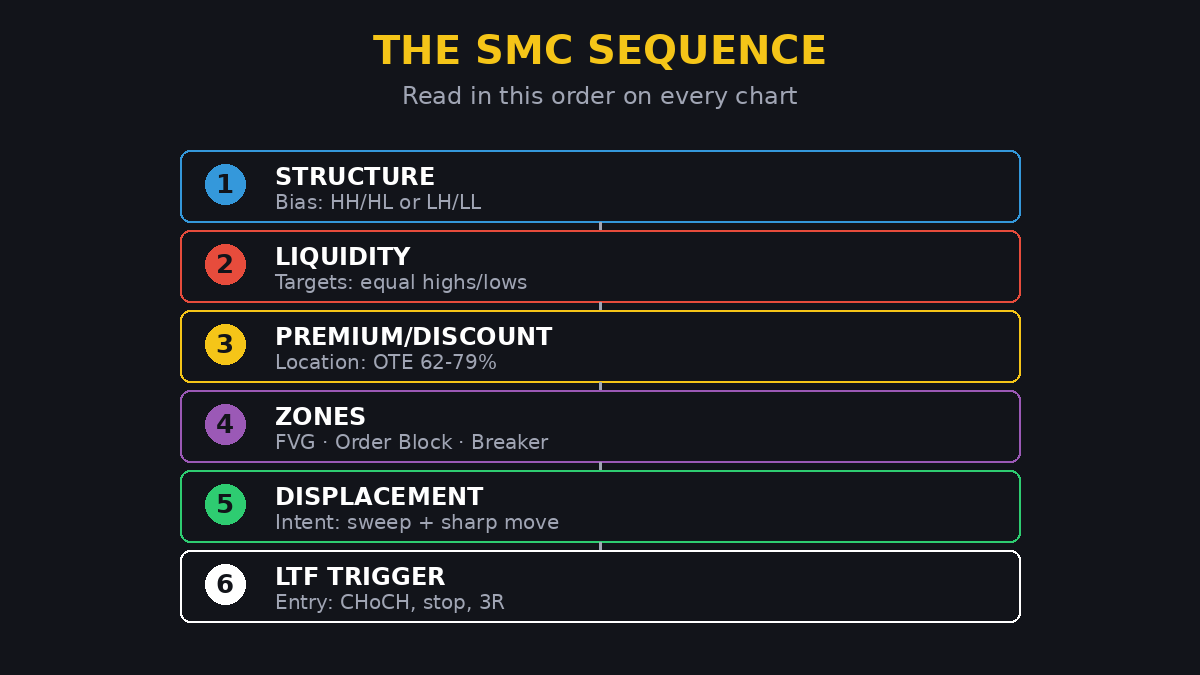
How it all connects: the full sequence
Here's how the concepts chain into one coherent read, in the order you'd actually use them:
- Structure sets bias. Read external structure on your timeframe: HH/HL (bullish) or LH/LL (bearish). A BOS keeps the bias; a CHoCH warns of a flip.
- Liquidity sets targets. Mark where the stops rest — equal highs/lows, old external swings. Price wants to visit these.
- Premium/discount sets location. Within the range, decide where your side gets the good price: discount for buys, premium for sells, refined by the OTE zone.
- Zones set the area. FVGs, order blocks, and breaker blocks inside your premium/discount area turn "somewhere around here" into precise levels.
- Displacement confirms intent. Sweeps followed by sharp displacement tell you the real move has started — not the fakeout.
- LTF structure triggers the entry. Drop down, wait for a CHoCH or BOS in your direction at the zone, place the stop at invalidation, and demand minimum 3R to pre-marked liquidity targets.
That six-step chain is SMC as a method. Our full entry model guide walks it start to finish on a real chart.
Five mistakes that ruin the method
1. Learning everything at once. BOS, CHoCH, FVGs, order blocks, liquidity — studied simultaneously, they blur into noise. Master structure first, then add one concept at a time.
2. Marking structure on every timeframe. Five charts give five biases. One timeframe defines structure; a lower one times entries. That's it.
3. Trading the sweep instead of the reaction. The sweep is the trap springing — the trade comes after, on the displacement back.
4. Entering at FVGs and order blocks blindly. Zones are areas of interest, not entries. Without trend alignment and confirmation, you're catching falling knives at pretty levels.
5. Ignoring premium and discount. A perfect CHoCH long at the top of the range — deep in premium — is still a bad trade. Location filters everything.
Where to go from here
If this is your first SMC guide, the recommended path: BOS vs CHoCH rules (structure language) → top-down analysis (multi-timeframe method) → premium and discount (location) → the full entry model (everything combined). Each builds on the last; skipped steps show up later as confusion.
Stop Drawing Structure by Hand
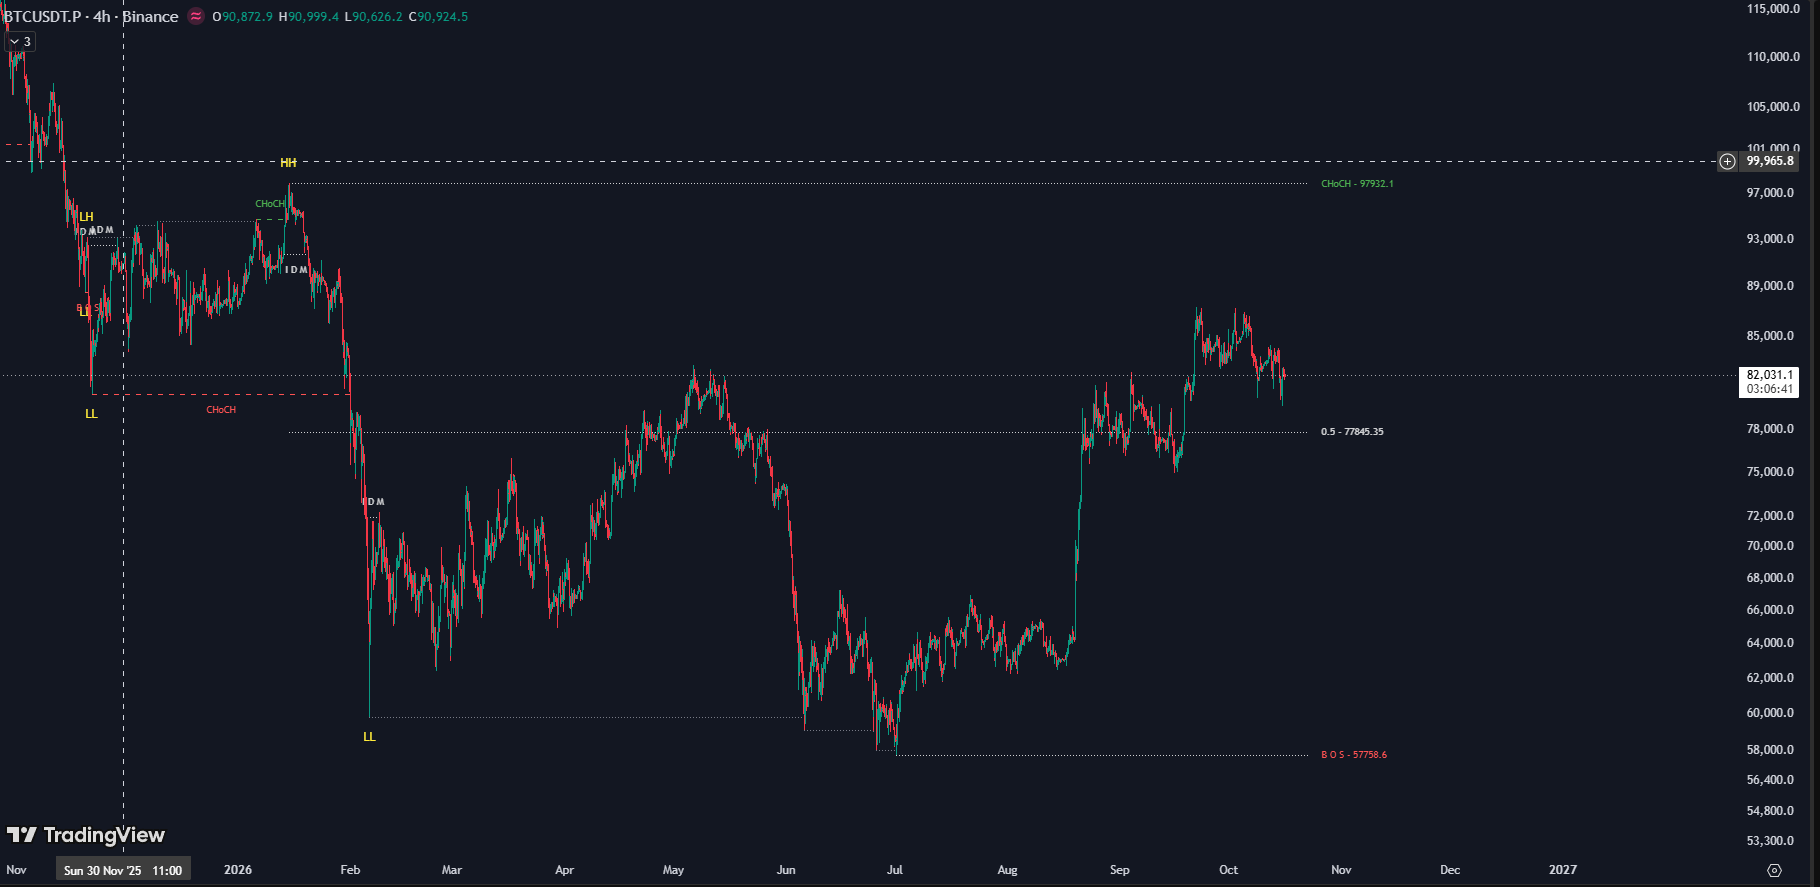
This is JUKA live on BTC 4H — every swing, BOS, CHoCH, IDM, and the premium/discount equilibrium labeled automatically, in real time.
No missed breaks. No mislabeled noise. No hours of hand-drawing. Full Pine Script v5 source code — yours to own forever, $150 one-time.
Get JUKA Source Code — $150