Trading Hub 3.0 (Part 16): 2025 Update – Marking Structure More Simply with Order Flow – SMC
In this new Trading Hub 3.0 update, we will learn how to map structure using inducement and order flow, which helps find entry points more easily and avoids missing many trades.
Guide to marking structure under the new Hub 3 in 2025
The theory used here is that after liquidity has been swept, the market will continue the previous trend every time it taps into Order Flow (provided there is no unmitigated POI located before it).
In bearish market conditions
 Marking SMC bearish structure 2023
Look at the bearish market chart above; this is how structure was marked under the old model (2023).
The market is bearish. We wait for price to break through the IDM and come back to mitigate Order Flow (POI), then switch the timeframe to the LTF to look for a sell point.
-> There are 2 POIs, a and b, for entries if we map structure this way.
With the new 2024 way of marking structure that Trading Hub 3.0 is about to guide you through below, we will have more entry points with high probability.
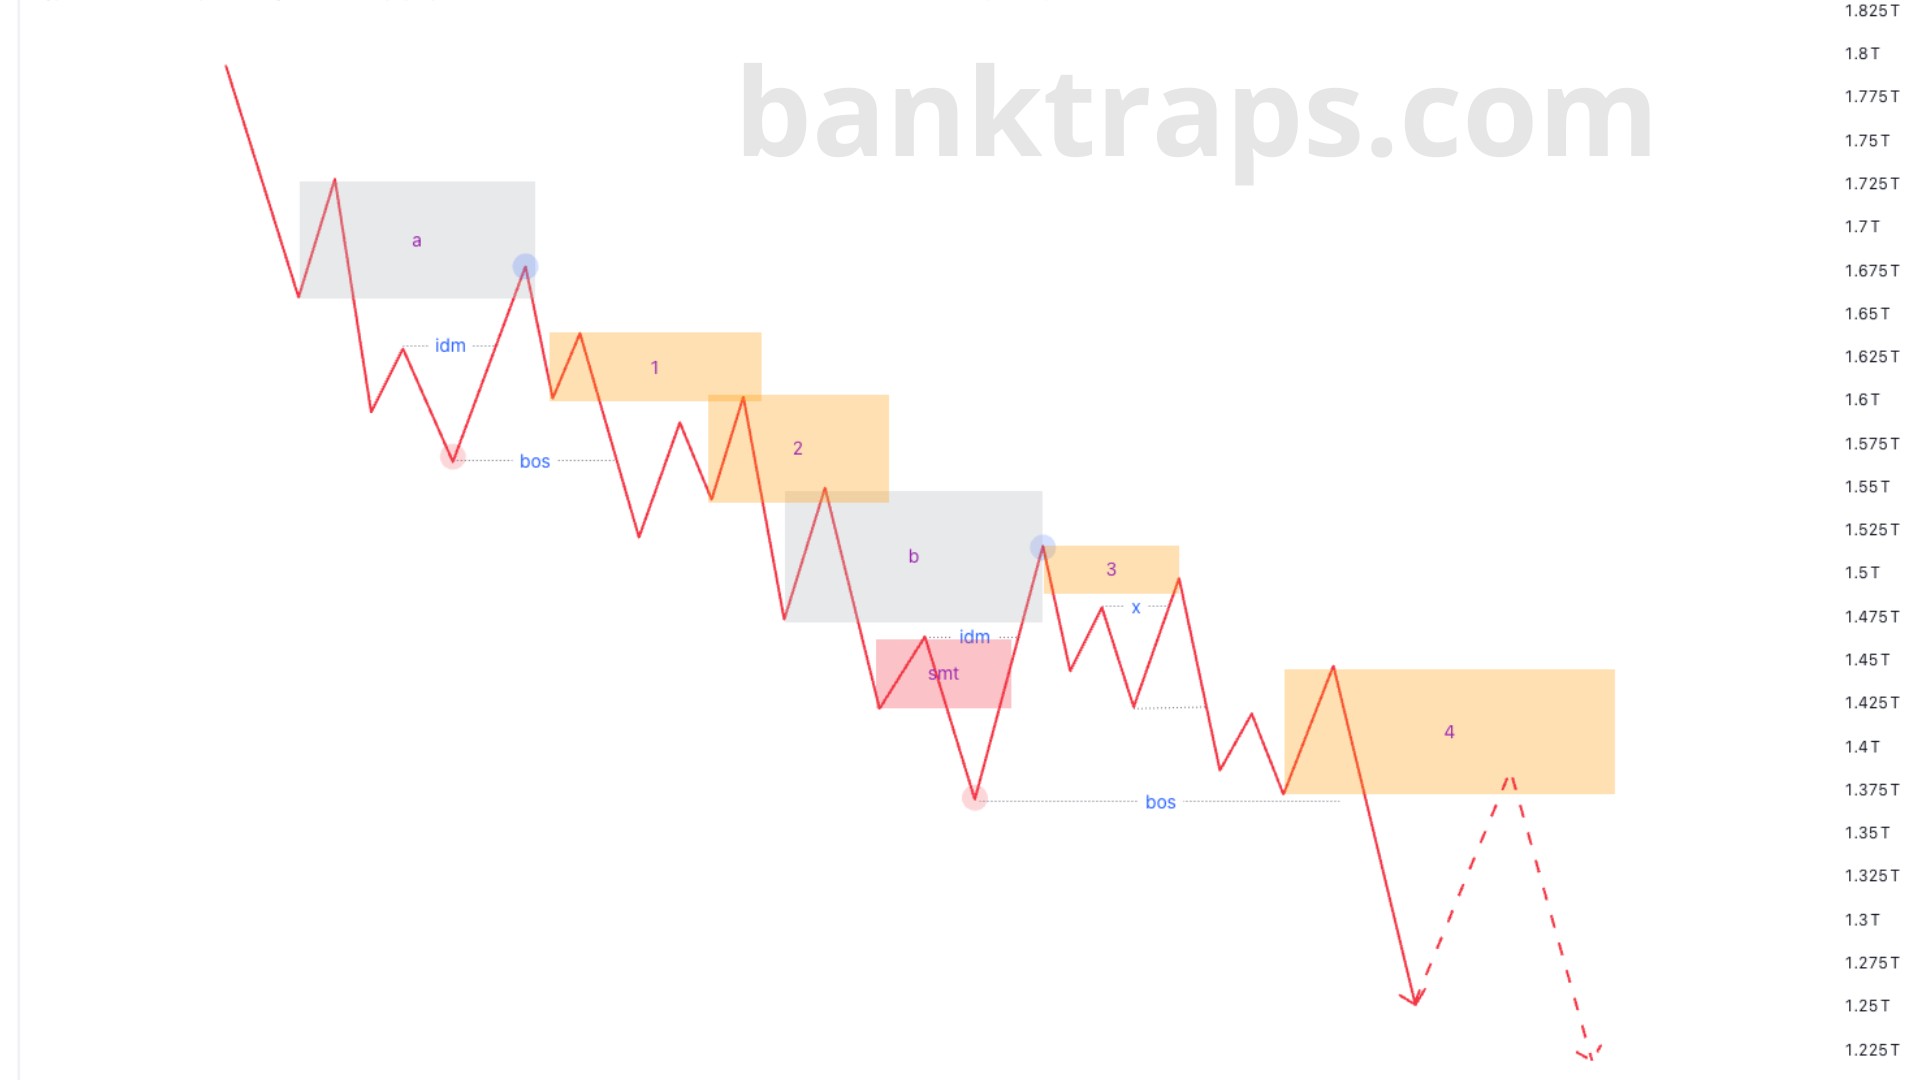 Marking SMC bearish structure 2024
On the same chart as before, marking structure in the new way will give us 6 POIs, explained as follows:
- POI a: price breaks through the first pullback, which is the IDM, then moves up and mitigates POI a, which is an unmitigated OF. We switch to the LTF and look for an entry point as we learned with the way of marking structure learned previously.
- POI 1: after taking liquidity at the previous IDM, price moves down, breaks structure creating a BOS and leaves an unmitigated OF, which is POI 1. When price moves up to mitigate this OF, we can drop to the LTF to look for a sell point without needing to wait for a break through the IDM (because the liquidity at the IDM of the previous structure was already sufficient).
- POI 2: after mitigating POI 1, price moves down and leaves an unmitigated OF, which is POI 2. When price pulls back to tap into this POI, we can also drop to the LTF to enter without needing an IDM.
- POI b: after mitigating POI 2, price moves down and leaves an unmitigated OF, which is POI b. At this point, if price moves up to mitigate POI b straight away, we can still go to the LTF to look for an entry. However, price did not move up, but created a pullback and then moved down, leaving an unmitigated OF; this OF is SMT. At this point we mark structure as learned previously, by waiting for price to move up, break through the IDM and mitigate POI b, then drop to the LTF to look for an entry point.
- POI 3: after mitigating POI b, price moves down and leaves an unmitigated OF, which is POI 3. At this point price forms an internal structure, creating an internal IDM (marked -x-). We can wait for price to break through the internal IDM and mitigate POI 3, then drop to the LTF to enter straight away without waiting for a BOS of the main structure.
- POI 4: price moves down, breaks structure creating a BOS and leaves an unmitigated order flow, which is POI 4. At this point we will wait for price to pull back up to mitigate POI 4 to enter at the LTF / or wait for price to create an IDM forming a new structure to enter as learned previously.
-> So, as long as the first IDM has been formed, we can absolutely trade at the LTF when price comes back to mitigate extreme POIs in line with the trend, without needing to wait for a new structure with a full IDM and BOS.
In bullish market conditions
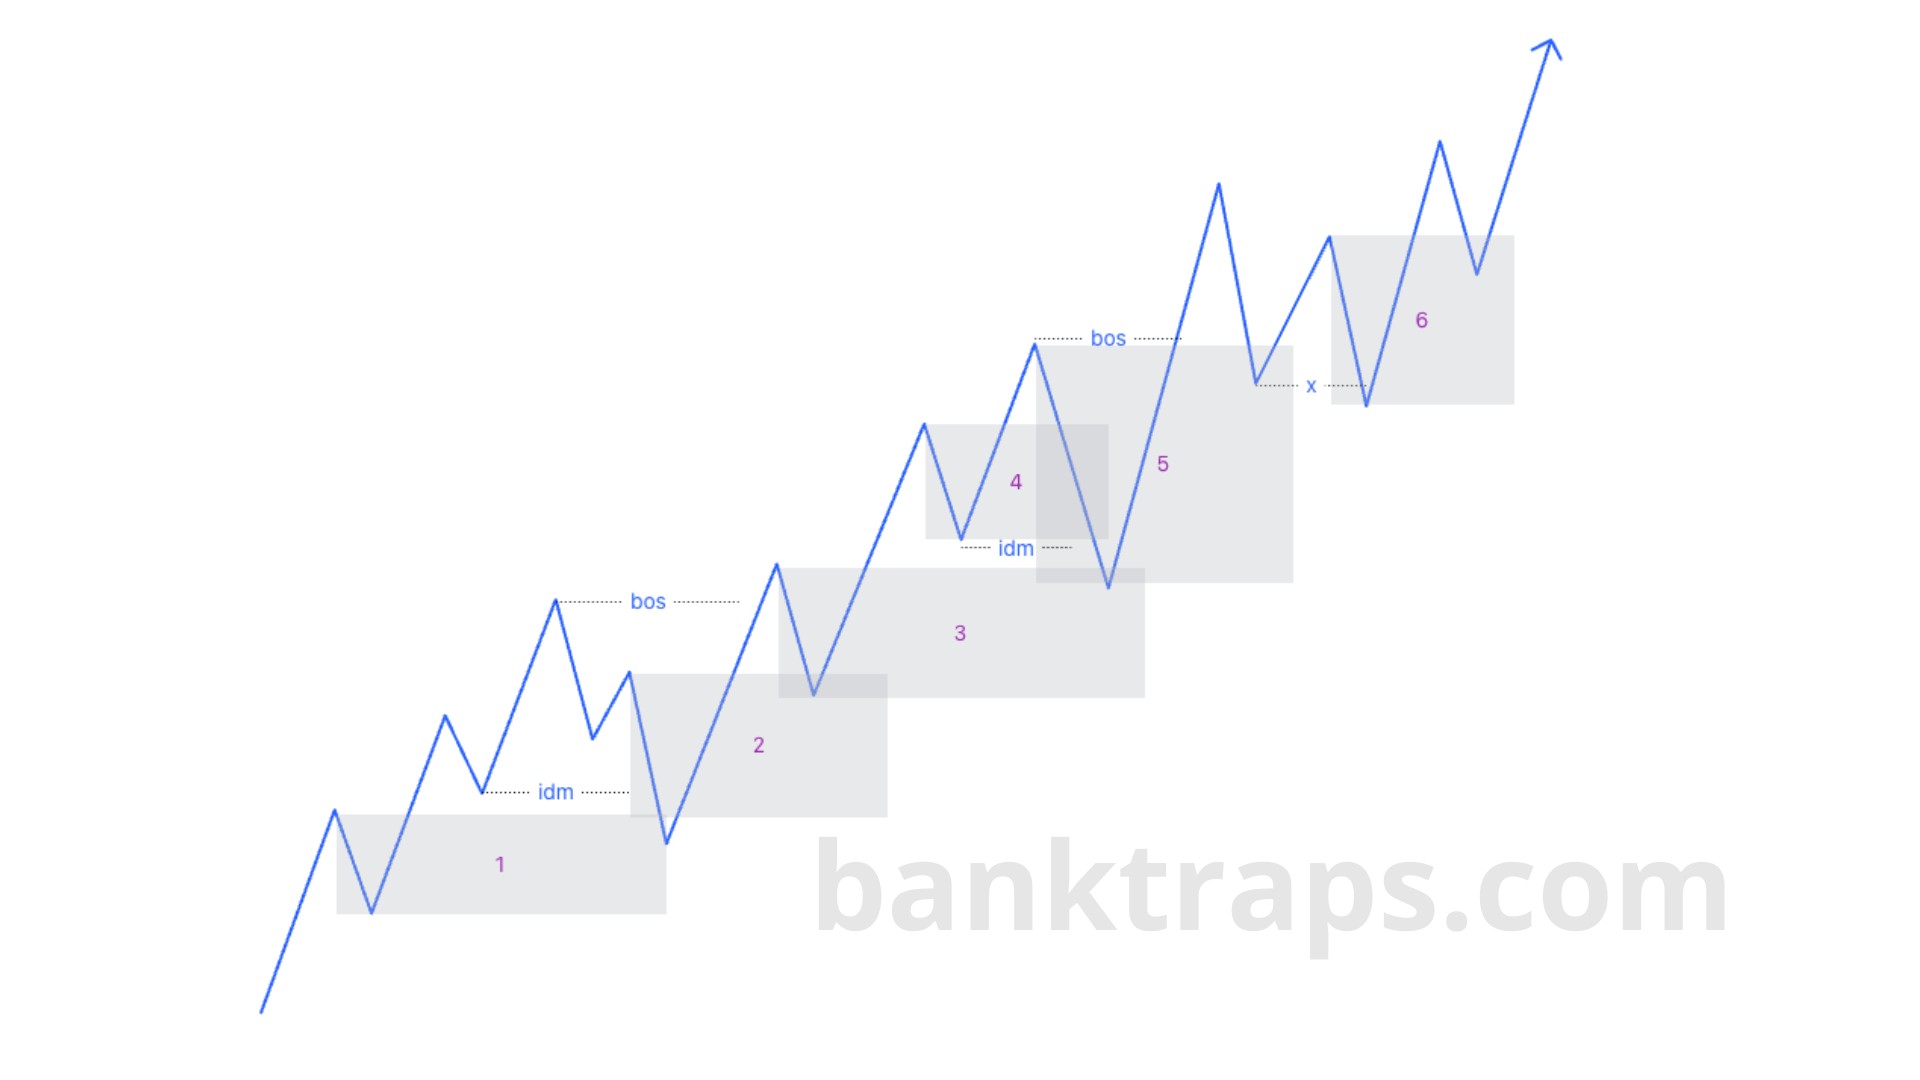 Marking bullish SMC structure 2024
Similarly, with bullish market conditions, readers should explain each POI in the image themselves, as Trading Hub 3.0 presented above, for practice.
Consider this an exercise, and if you get stuck, ask the Trading Hub 3.0 admins in the group https://t.me/banktrapscom.
Entering trades with order flow without missing trades
Entering trades at the LTF
After price taps into a POI, we switch to a lower timeframe to wait for a CE (confirm entry) to enter.
The way to enter at the LTF basically still follows the theory learned previously; please read the entry modules again.
Price taps into an LTF OF
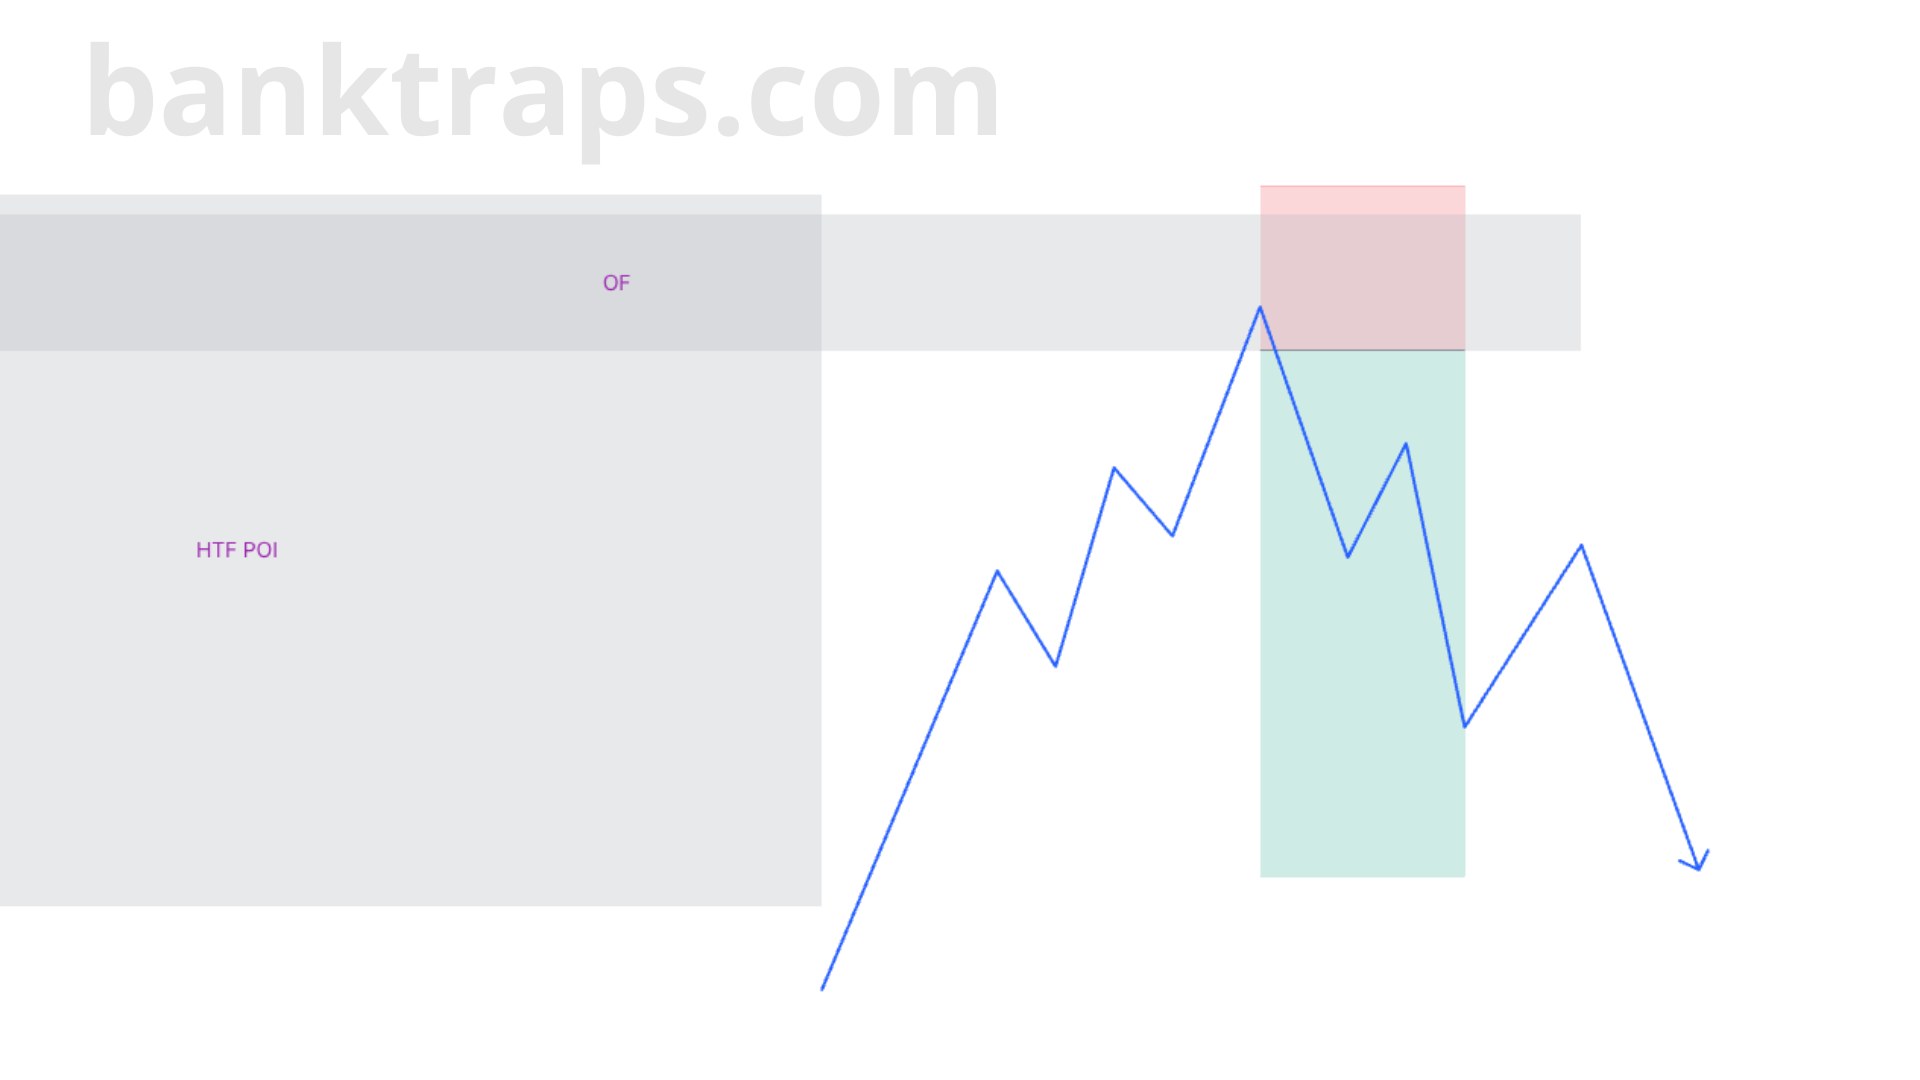 Price taps into an unmitigated LTF OF
On the lower timeframe, when price taps into an unmitigated OF, we can enter directly straight away.
If there are many unmitigated OFs, prioritise entering at the unmitigated Extreme.
If all OFs have been mitigated, wait for price to create a CHoCH as below.
Price creates an LTF CHoCH
1. Sweeps the IDM and leaves a wick rejection
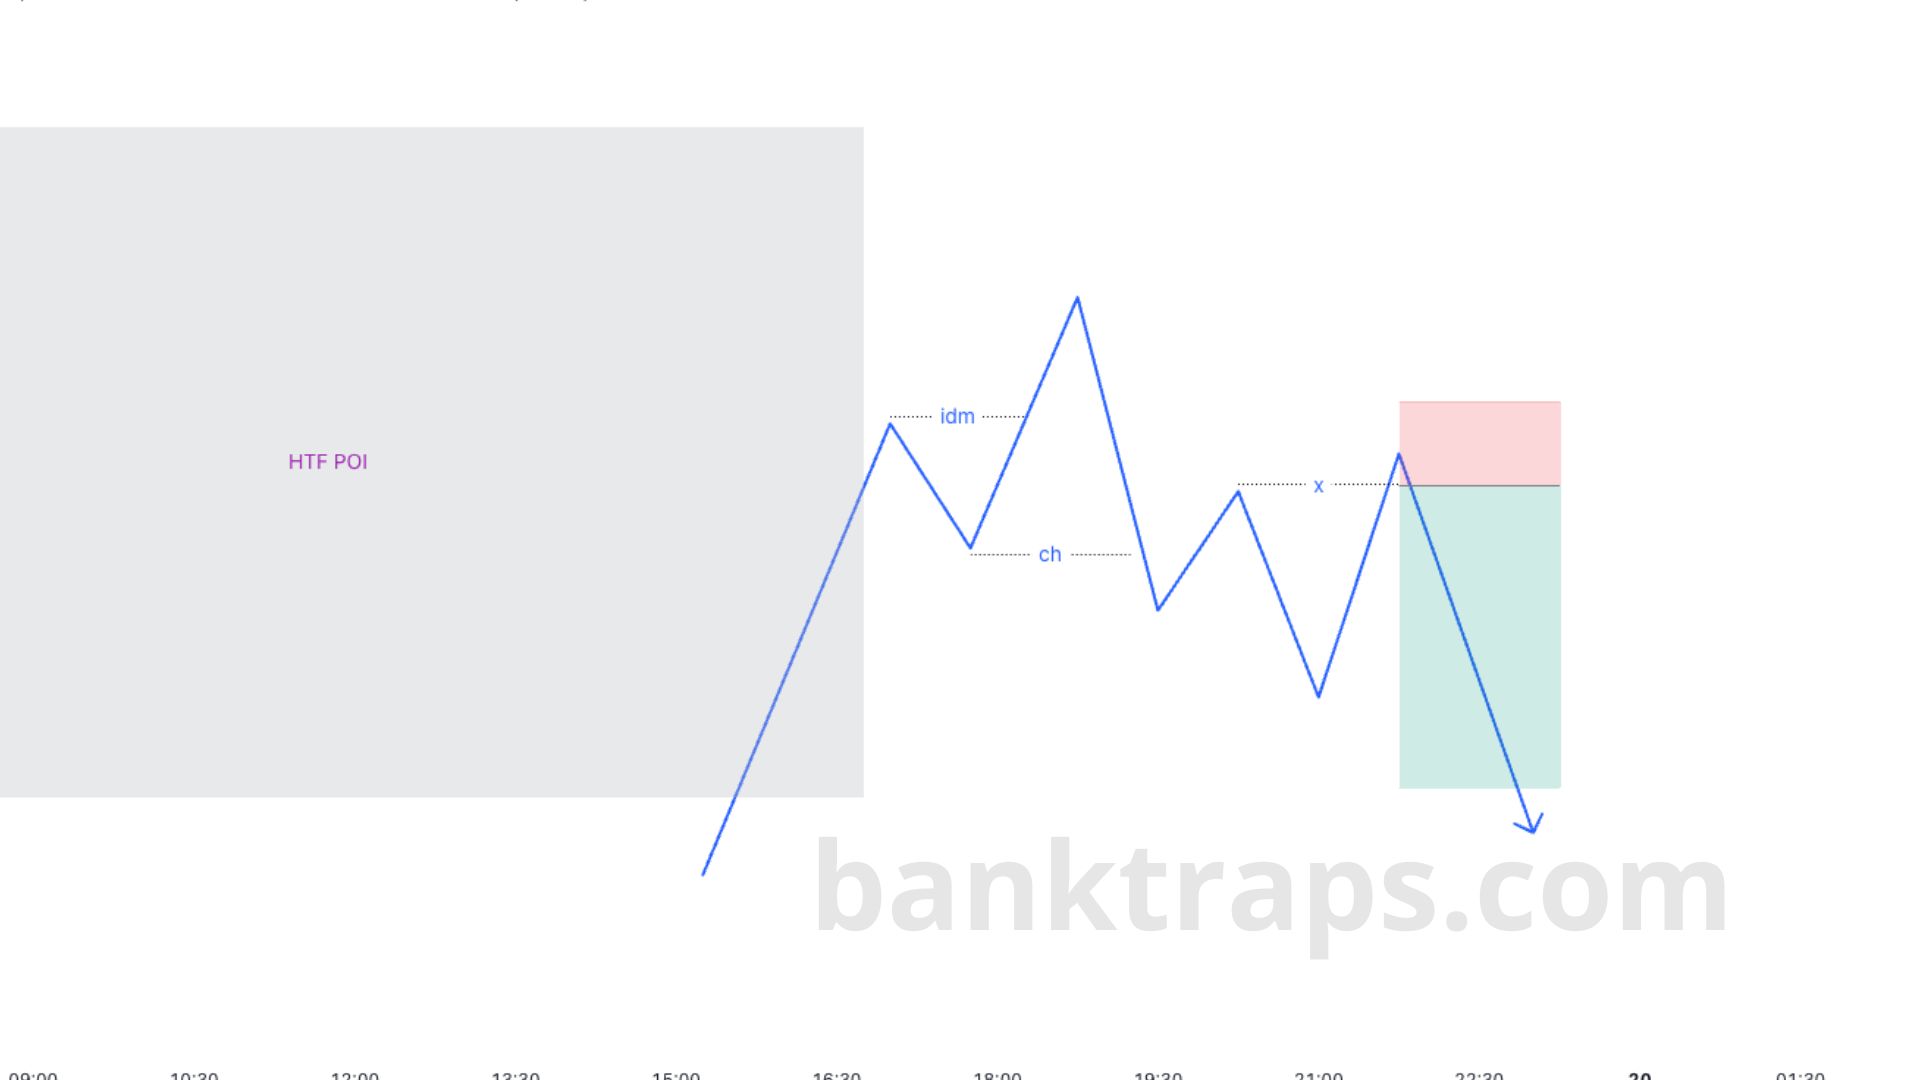 Reversal CHoCH – sweeping the IDM with a wick rejection
When price sweeps the IDM and leaves a wick rejection, we can enter based on SCOB. See again how to enter following SCOB.
2. Sweeps the liquidity of the previous high and leaves a wick rejection
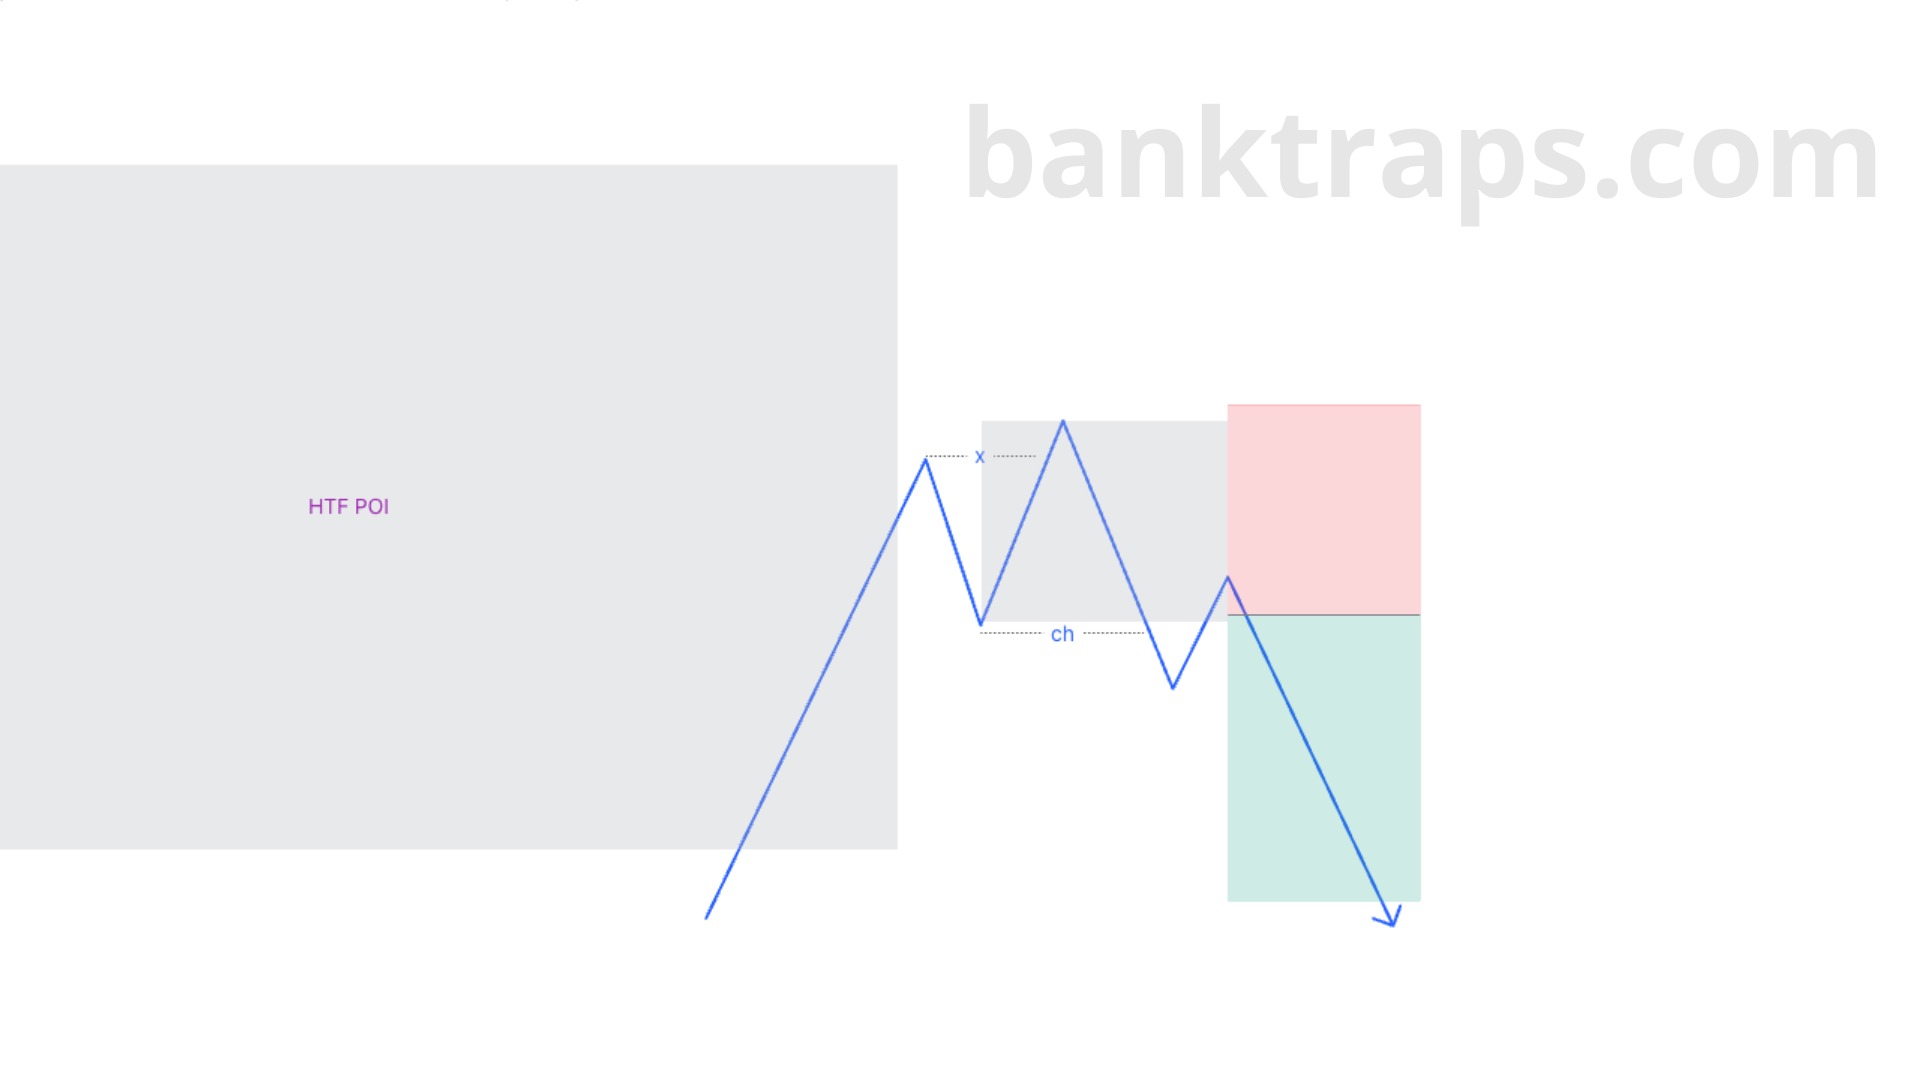 Sweeping the liquidity of the previous high
Before creating a CHoCH, price swept the previous high and left a wick rejection; we can enter as soon as price comes back to mitigate the Extreme OF without needing to wait for the IDM.
3. Breaks through the IDM
When price has not tapped a POI yet but has already created a CHoCH:
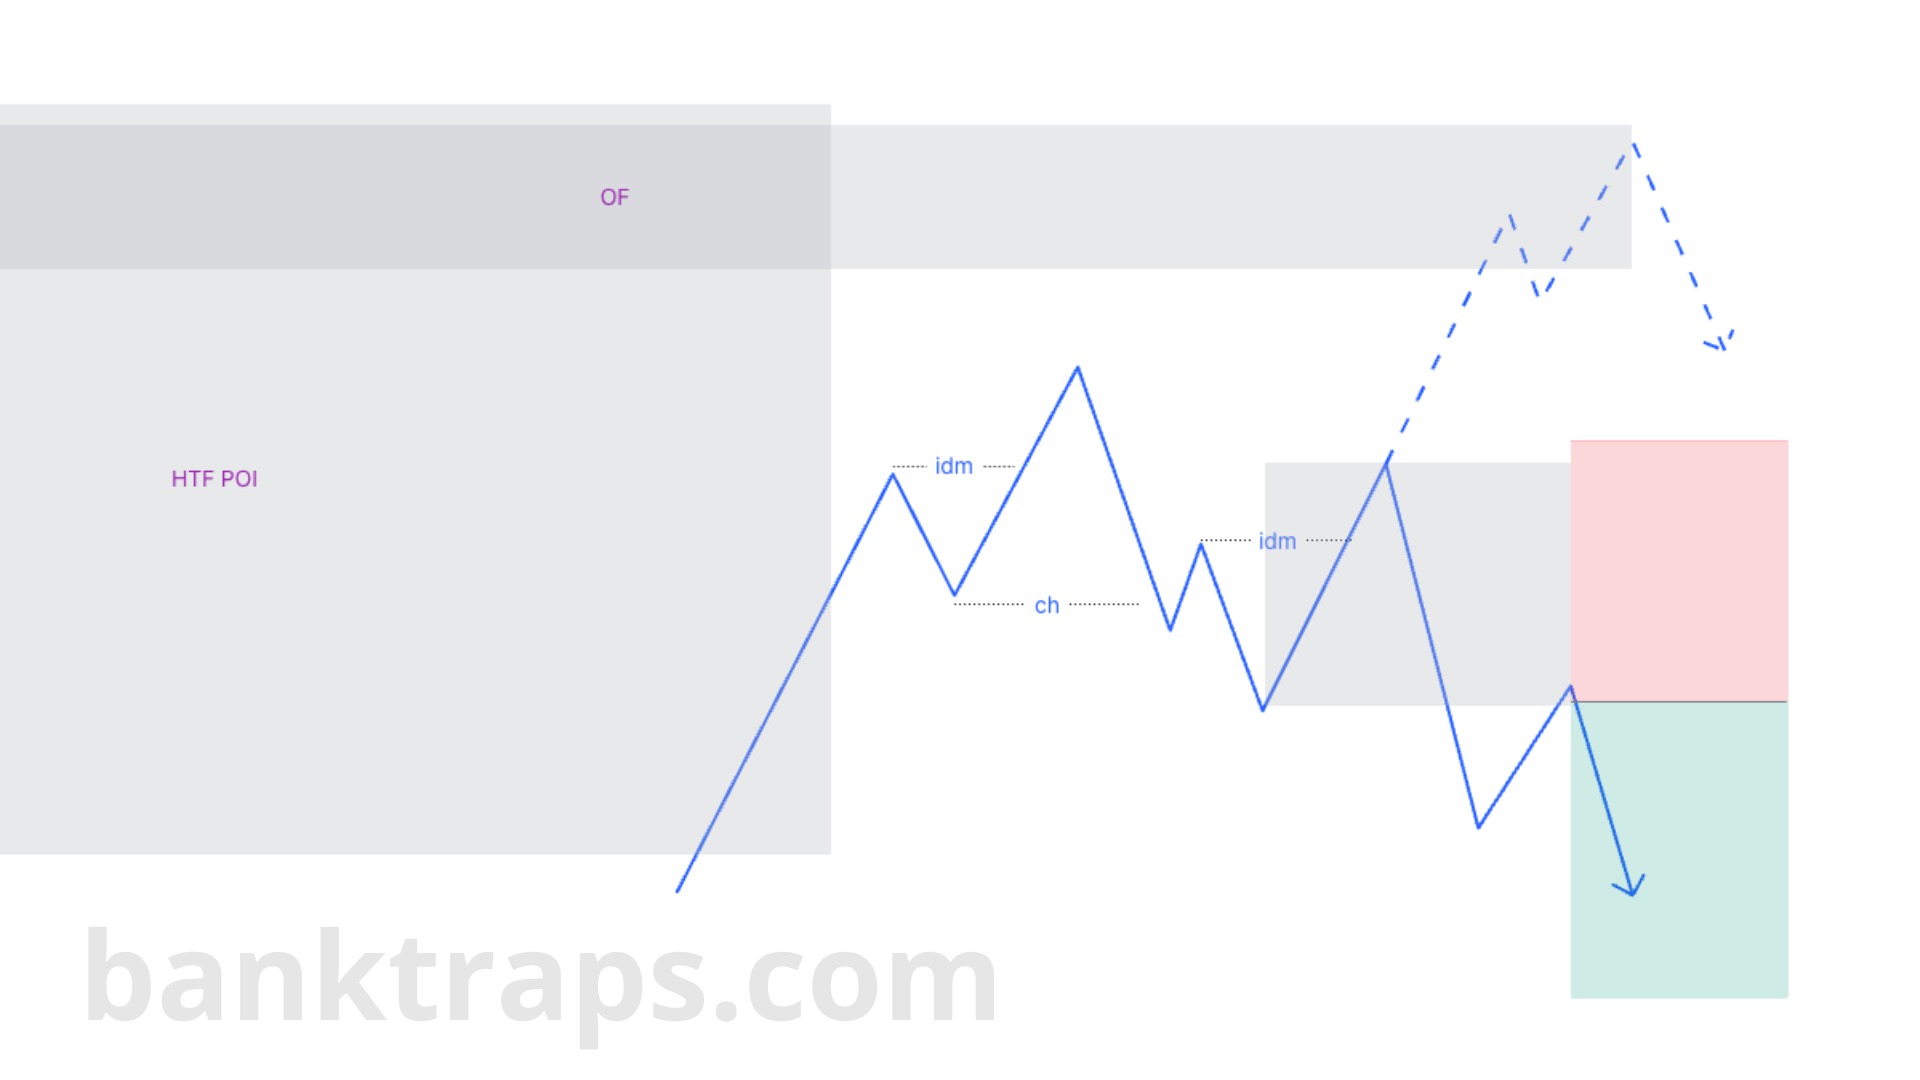 Entering when price breaks through the IDM
After creating a CHoCH giving a reversal signal, price breaks through the IDM and then moves down; we wait for price to come back to mitigate the OF to enter.
After breaking through the IDM, if price does not move down -> this may be a fake CHoCH, and we need to wait for the next price reaction:
- Price will move up to mitigate the extreme OF located inside the HTF POI, as in the image.
- Price will then create another CHoCH.
Tips: To avoid fake CHoCHs, prioritise CHoCHs at locations where price taps a POI or sweeps liquidity.
How to find entry points at LTF order flow
5/5 - (3 votes)
Read structure 10x faster with JUKA
JUKA maps SMC structure — swings, BOS, CHoCH and inducement zones — automatically on any TradingView chart. No more hand-drawing structure for hours.
Get JUKA — $150